My Etsy Store

Wednesday, June 26, 2013

Toddler Pillow & Fun Pillowcases

So as a WAHM that makes fun, homemade items for a living, most people think my daughter gets new creations everyday.  The sad truth, I'm so busy making things for all my great customers that I rarely have time to make anything for my daughter.  And my husband's requests...yeah right?!  Poor guy =/

But now that she is getting older and can ask for special things, I'm forcing myself to carve out time to craft with her and for her.  It sounds terrible I know, but with paying customers I don't want anyone to wait longer than they have to.  But at the same time, I'm so busy at this point in my business there is never a day when I don't have something to make for someone.  So Mommy/Daughter Craft Day will be making its way into the schedule. 

I've made her a few things over her 2.5 years.  Before even starting my at home business, I made her a knit squares baby blanket before she was born.  She still sleeps with it today, and looking back at it I've come a long way myself..lol  I also made her a few knit hats, diaper covers, & wool mittens.  But as my work load has increased, and I'm so thankful for the business, my free time has decreased & I put more and more projects for her off to the side. 

She recently saw me working on a custom "Look-A-Like" baby doll and asked for one, so to practice I created one for her as well.

  
I also made her a surprise blanket with her name on it for her birthday.  She "helped" me pick out great finds from the remnant bin at JoAnn's & I used one of her favorite finds to create a squishy double-sided blanket for her and hand-stitched her name onto one corner in felt letters.  I need to get some pictures of it!  She loves this blanket and sleeps with it underneath the first tiny blanket I knit for her.  She calls her tiny one her towel ;)

Now that she is using the covers so well, she decided she wanted to try a pillow.  So that brings me to the title of this post.  I didn't want to buy her a large adult pillow because she is tiny and so is her bed. So I decided that I could make her the perfect size pillow and create fun pillowcases for it.  I took her to the fabric store and she wanted My Little Pony fabric. (A recent new obsession)  The giant fabric store had none. =(  I didn't want to leave empty handed, so she picked out a replacement Minnie Mouse fabric after contemplating Sesame Street for a while.

Second fabric store, still no My Little Pony!  I've resigned to only Minnie Mouse for now and shopping online for the MLP, when browsing the clearance section as I always do...Alas My Little Pony fabric AND it's on sale!

So without further adieu, the muslin toddler pillow stuffed with my favorite organic stuffing that I use in my rattles and dolls.  And 2 fun pillowcases with interesting accent stitches!


Thursday, June 6, 2013

Snacks for Toddlers: Candy Chickpeas!!

So I've been trying a few things here and there and forgetting to post about them.  =/
But this recipe made me remember!!

My husband & I have been eating loads of hummus lately because it is so yummy & easy to make.  You can do so many different things with it.  We've really been loving it!  So we tried giving it to our toddler.  She eats it here and there; she'll dip homemade tortilla chips in it, but she isn't really eating much of it.  But this wasn't a total fail, so I decide to explore chickpeas a little further.
(chickpeas are typically the beans used in making hummus.  If you've never heard of them I honestly hadn't either until I was interested in making hummus.  They are also called Garbanzo beans.  That's a fun name, right?!)

So I started looking for other ways to use Chickpeas and found a fun recipe we call "Candy Peas"
It is completely easy to make and anything we call candy gets a taste from our toddler at least once!!

So here it is:

Ingredients
  • 15 ounce can chickpeas (garbanzo beans) – or 2 cups cooked chickpeas
  • 1 teaspoon ground cinnamon
  • 2 teaspoons olive oil – liquid
  • 1 tablespoon honey
Instructions
  1. Preheat oven to 375 degrees.
  2. Drain and rinse chickpeas well.
  3. Pat chickpeas dry with paper towels.
  4. In a small bowl, mix together the coconut oil and cinnamon. Add chickpeas and stir until well coated.
  5. Spread chickpeas onto baking sheet and bake for 35-40 minutes, or until crunchy and no longer soft in the middle. (I shake the pan every 10 minutes)
  6. Place hot chickpeas in a small bowl and coat with honey, mixing evenly.
  7. Spread back onto baking sheet and allow to dry and cool.
  8. Store in an airtight container at room temperature
Nutrition Information
Serving size: ½ cup Calories: 134.3 Fat: 4.1 Saturated fat: 2.1 Unsaturated fat: 1.1 Trans fat: 0 Carbohydrates: 20.5 Sugar: 4.9 Sodium: 288.9 Fiber: 5.6 Protein: 5.3 Cholesterol: 0

I find that I need to cook them longer than I think because you want them to be very dry and crunchy to get that candy taste.  I also add more honey than the original recipe & even sprinkled a little sugar on them when they were still warm.

I have to say they were a BIG hit with our toddler and me.  They are a little addicting once you start eating them!  They kept well for several days and were a fun addition to snack time and her dinner plate.

I'd love to hear from you if you give them a try! =)

Monday, April 8, 2013

Is it Spring Time yet!!?? Fresh Veggie Risotto

We are so ready for Spring in this house!!  It has been an unusual Winter with late snows into March.  My daughter & I love to play outside, work in the garden, go to the playground, & it has been too cold & yucky outside for too long.  We finally have had some warmer, pretty weather this week, & in an effort to ring in Spring we planted our garden & made fresh veggie risotto for dinner.

I wish I had taken some pics as we put the garden together, but I'll take some later when it is completely finished.
What I do have for you is a super simple, versatile recipe which you can amend depending on which veggies you can get your hands on.  I think it is my absolute favorite recipe to make during veggie season, & I've probably never made it exactly the same way twice.

You'll need:
risotto rice 1 1/2 cups (a short grained rice that can be a little tricky to find sometimes.  My Whole Foods sells it  in the bulk section which is a really good deal!)
chicken broth (about 4 cups)
veggies (I usually do 1 each of 4+ different veggies) I've used eggplant, zucchini, broccoli, onion, bell peppers, mushrooms, asparagus...the options are endless
Olive Oil (about a TBSP)

First heat your oven to 425, chop all your veggies to 1 inch pieces. (think a little bigger than bite size.  Once you roast them they will be smaller)

Put them on the roasting pan that came with your oven =)  Did you get one of those?  I ended up with 2 after moving to a new house, so I fill both of them full of veggies & add about 1/2 cup of chicken broth or water to the bottom of the pan.  Then season the veggies with whatever you like.  I usually go with a basil base, but lots of flavors can work with this dish.

Go ahead and put them in the oven for about 20 minutes.  You'll prepare the rice while the veggies roast.


Now heat oil in a LARGE pan & brown the rice slightly. Takes about 2 minutes but don't burn it.

Heat your remaining chicken broth to a slow boil in a saucepan.  Add about 1/2 cup at a time to your rice and stir on medium heat until the broth cooks out. Then add another 1/2 cup of hot broth & do the same.  This dish does require you to stand at the stove the whole time and stir a lot, but it creates a soft creamy rice that is soooooo yummy.

You'll continue in this fashion until all your broth is gone.  It takes about 20 minutes so your veggies should be done when your rice is done.

Now simply add your veggies to your large pan with the rice and stir.  Heat it thru & serve!!  We add Parmesan cheese to our bowls and not to the whole dish since my daughter has a dairy sensitivity.  This dish is so good and so easy to change depending on what to have available.  Hope you enjoy it!!


You can also add a meat to this if you wish, but for us, it is a great filling dish with just the veggies and leaves us feeling great after eating it.  Just a good clean meal!!


Thursday, March 21, 2013

Snow Day Mittens

Why will it not stop snowing!?  For goodness sake, it is officially Spring now and it snowed again this morning.  We are ready for some warmer weather in this house so we can get outside & play!!

But when you do go out to play in the snow, it can be hard equipping a toddler with gear that is both comfortable & warm.  When my little girl was smaller last winter, I just bundled her up until she looked like the Marshmellow Man & didn't worry about how well she could move around. Because well, she wasn't able to move around much anyway.  However, this year is very different, she wants to run and play in the snow, build a snowman, & go sledding.  So the poor thing needs to be able to move her arms and use her hands.

We had a horrible time finding snow boots in her size that got the job done.  NOTE: if you buy boots that look like they have a thin layer of felt on the bottom, your child will grow platform snowshoes as she walks & fall over after a few steps!!  The boots we bought had some sort of microfiber something in the sole and they literally collected giant snowballs on the bottoms of her feet with just a few steps.  They were awful & worthless for the snow.  I finally found some at a consignment store that were her size, but unfortunately that was after the majority of our good sledding snow.  But oh well, she still got to use them this year to build a great snowman!

And now on to the title of this post....the snow day mittens.  All the waterproof type mittens for little ones were WAAAAAY too big for her.  Her grandparents bought her some that she will grow into, but so far as really using her hands with them this year, not gonna happen.  So I browsed a few patterns available for free online and pieced together a design that I am very happy with & it is relatively easy to adjust in size.  Knowing what I know about wool yarn & the great properties of wool for cloth diapering, I figured you could get a pretty good water barrier out of a pair of tightly knit wool gloves.  And thankfully I was right!!  Wool is awesome in so many ways.  Hunters already know that wool socks are great because they breathe while keeping your feet warm but not sweaty & if you get wool wet it still holds in your body heat.  Unlike cotton & many other fabrics that once wet, you're also cold & wet.  
I could go on about wool for a while and talk about the natural lanolin from sheep that acts as a moisture barrier & the antibacterial properties of wool, but I'll stop with this....

My daughter built this snowman with me and my hands were freezing (I haven't made any wool gloves for myself yet, but I will) she played in it, sat in it, made snowballs, etc  & when we pulled these gloves off her hands were perfectly toasty.  I was very pleased!!

If you knit and need help figuring out how to make a good pair let me know.  If you don't knit, but would like a custom pair for your kids, I'd love to make some for you.  Price will depend on size and style, but these gloves will last several seasons before they outgrow them & they should last forever to pass down to little brother & sister as long as the dog doesn't chew them up ;)


Wednesday, February 20, 2013

Getting a Toddler to Eat Veggies

So my daughter LOVED her veggies as a baby. I made all her baby food from fresh produce and she gobbled it up.  I often mixed green veggies with sweet potatoes and she ALWAYS ate them.  But...

we found out after she developed a diaper rash for the first time ever at 6 months, that she had sensitivities to orange and yellow veggies. Weird right?  The doctor thinks she will outgrow this eventually along with her dairy sensitivity, but in the meantime I'm continually searching for recipes for the whole family that don't include dairy or orange and yellow veggies (especially carrots & sweet potatoes which bring the worst of the rash)

This is really hard most of the time because one, I LOVE cheese, and two, green veggies without cheese don't often taste that great.  At least not the way I was accustomed to cooking them.  So I have to find ways that make them taste good and leave all that yummy dairy aside.

I'll be documenting some of my experiments here and let you know which recipes my toddler will at least eat, even if only a little.

First up Kale Chips!


So Pinterest is a great resource for recipes, but not so specifically for my restrictions.  But I found several ideas for Kale Chips and pinned them.  I read them all and sort of created my own version.

1. First buy some Kale.  Kale looks just like mustard greens to me. I had to dig thru and read the little twist-ties to make sure I had the right veggie..LOL

2. Wash it and pull or cut the green leafy sections from the harder whitish stalks.

3. Throw it in a bowl or zipper bag and toss with your choice of seasonings and EVOO.  I like using fresh ground salt, pepper, and some garlic powder...or skip the plain salt and use garlic salt.

TIP: Don't add too much olive oil because your leaves will be too wet and they won't get crunchy enough.  You want them super crisp so they are easy for your toddler to eat and you can call them chips!  (too much EVOO makes them chewy and harder to eat)

4. I experimented with different cooking times and heats to achieve the best crisp.  I found cooking at a lower heat for a longer amount of time helped get them good and crispy without too much browning.  I liked 200 degrees for 30-40 minutes stirring when you can.  I also cooked at 400 degrees for 20 minutes, but the "chips" were very inconsistent and I had to dig thru and pick out ones crisp enough for my toddler to eat.  If they were too tough, she'd chew a while, spit it out, and not want anymore =/

TIPS:
Let your little one help you tear the chips and season them.  All of which is pretty easy and not too messy.  Getting them involved motivates them to eat what THEY made.  It can at least help you get that first bite which is all you need sometimes to get them eating a new food!

Call them "green chips" like we do or some other fun name that resembles something your little one already like to eat.  Helps get them excited about the food and again get you that so important first bite.

Don't bug them too much!  If they sense you're being weird or pushy about them eating it, they'll likely be very stubborn against the idea.  Sometimes I don't even say anything about a new food on the plate.  If I don't act like I really want her to eat it, she thinks it's just another item and tries it. =)

You can also find prewashed, precut kale in a bag at some stores.  I've had the best luck finding this at specialty stores like Whole Foods and Trader Joes.


Please let me know if you try Kale Chips and if it works for your little ones! Also, please share veggie recipes that your kids love and any tips you've learned with feeding your kids healthy foods!

Upcoming Posts:  Green Smoothies & Roasted Cabbage "chips"

Friday, February 8, 2013

Learning Tower Review: These things are AWESOME!

With my daughter's birthday being a month before Christmas, we get WAY too many toys all at once.  This year I was trying really hard to come up with "Non-toy" items to suggest to the grandparents.  As I was pondering good ideas from friends, such as memberships to the zoo and kids museum, I knew they'd want something you could actually put your hands on, too.  
That's when I remembered the Learning Tower that I used with some kids I used to tutor a couple years ago.  It is a great invention that brings kids up to counter height safely.  You can now do messy projects together, bake/mix things together, reach the sink for washing dishes & hands, the possibilities are really endless.  It really promotes learning and independence, and my daughter LOVES it!  She is super inquisitive and loves helping because "she's a big girl"
We got one  LIKE THIS
We are loving it! I think the design is pretty good. When investigating models, I did find one with cute little shape cut-outs in the walls. Reviews said these were awful because kids could stick their feet in the shape holes and climb.
Here are a few pics of us making waffles together!  Obviously, don't position the tower near dangerous things like knife blocks, stove tops, etc.  I do have to remind her daddy to look around and make sure he isn't placing her too close to anything like that (He is an awesome daddy, but for some reason his mind doesn't always think thru all those things...lol)


When she sees me getting ready to cook, she asks for her tower and asks if she can mix.  Baking cookies together has been so fun for both of us.  It also seems to encourage her to eat new things that she helps make such as Kale Chips!  (really easy to make, I'll talk about these in a post soon.  I've been experimenting with lots of new ways to get her to get green veggies)

Wednesday, January 30, 2013

Simple Layered Skirt

Simple Layered Skirt


So if you are reading this blog you may know about my little business. The popular word around the craft world is WAHM meaning Work-At-Home-Mom. I work from home while raising my daughter and I knit, crochet, and sew gift items. Mostly you will find items for babies and young kids, but I also have several gifts for Mommy and even make hats and gloves for the men!

I started my business just with the knitting, then incorporated crochet items, & more recently I've started selling hand-sewn & machine sewn items.
I taught myself how to do all of these things, so I am always curious and interested when I come across other craft blogs to see which techniques others use. I almost always learn something new and have a lot of fun while doing it.

This skirt project came from playing around on another blog called crazy little projects. She has 4 boys but she still loves making cute girl items as gifts. If you like crafting, I suggest you try out her blog!

I'm not going to completely redo her awesome tutorial, but I will give you the link and talk you thru how it went for me.  So, check out her tutorial HERE 
She is also doing an awesome series right now about learning to sew where she walks you thru some techniques and gives you some projects to practice with...I LOVE this idea!  If you are new to sewing or just want to review the basic skills again with some cute easy projects check it out HERE

I found some great fabric at Tuesday Morning which sometimes has great yarn and fat quarters of fabric at great prices. It is fun looking for it because you never know what you're going to find!  That's the garage sale girl in me; I never have time to shop garage sales or the like, but I would REALLY love to..lol

You can get away with 1/4 yd of each fabric for this skirt if you are making it for 2T or smaller. My pack of matching fabrics was 1/4 yd each and the longest section was just long enough to use that I didn't even trim it. (If you're worried you might make a mistake, buy 1/2yd of each and have some left over)
You'll need elastic: I used 1/2in wide and only needed 17in in length for my skinny mini.

I also used a big safety pin to push my elastic thru the casing at the end, but MAN this gave me some HUGE issues for something that is usually easy.  Maybe I need to practice this more.

So follow her instructions for how much to cut, determining your length etc. Once I had everything ready, I ironed down all my hems for the bottom of each layer, pinned them and sewed them down.
Easy breezy so far...

My first slight slow down was when I lined up all my layers preparing to sew down the top for the casing.  I am a complete perfectionist and I want everything to line up perfectly, and because each layer was cut separately...they were not a perfect match to each other.  Honestly this doesn't matter too much, when you sew everything together, granted you sew it straight, it all comes out looking nice and pretty in the end. BUT...I always trim everything up again to make it nice and neat before finishing.

You've already sewn your bottom hems at this point, so you can adjust the layers from the top to get them just right.
I made my casing and began what took the most time of all during this project...PULLING THE ELASTIC THRU THE CASING.....UGH

How did I manage to make this fairly simple task so hard you ask? 
Attempt #1:
Well, I pinned one end of my elastic with my giant safety pin and began pushing it thru while holding the other end.  I got about 3/4 of the way thru and accidentally let go of the other end. Once it disappears into the casing there is no getting it back.
Attempt #2:
This time I wise up and realize it is worth a couple seconds to find another safety pin and pin the other end to the casing so it can't jump thru.  I start pushing my giant safety pin at the other end thru the casing once again.  About 3/4 of the way thru again, and the fabric is getting really bunched up on the elastic because we are making a ruffle skirt and that's what it is going to do. Maybe I should have just started with a bigger piece of elastic to solve this problem, but 17in is all I had so I was determined to make it work. With too much pressure with all that gathered fabric with safety pin opens and jams itself inside my casing...CRAP  I pulled it back out the other end.
Attempt #3:
I'm assuming now looking back that I must have bent my safety pin on attempt #2 because it opened several times on this trip thru the casing. Instead of starting over and fiddled with it inside the casing to close it back up and keep going.  This worked great until the dreaded 3/4 done. It opened and got stuck..and I mean STUCK. It wouldn't go thru, it wouldn't come back out the way it went in, & I couldn't see what was going on in there!  I fought it for I don't know how long, thinking I was going to have to rip out the casing stitches.  Eventually I got the bloody thing to come back out the way it went in, but it was in awful shape.  It even had fabric stuck in the head which I guess I finally ripped off and that's why it released. 
Attempt #4:
At this point I'm very mad and a little embarrassed that a simple elastic has done this to me. I bend my pin back in shape and decide to send it thru the casing starting at the other end, hoping whatever mess I've caused in there, it will be easier to pass going the opposite direction.  This FINALLY works and we have elastic all the way thru the casing. I unpin the other end to find where I want to sew it together to fit my little bit, and then she decides she needs to go potty.  In my rush to take off with her, I accidentally let that end go and can't rescue it in time...=(   Let's potty I'll do this later.

I don't even want to look at this skirt anymore, and I don't until after my little one has gone to bed.

Attempt #5:
Goes exactly like it is supposed to and I'm done in 5 minutes.  =)

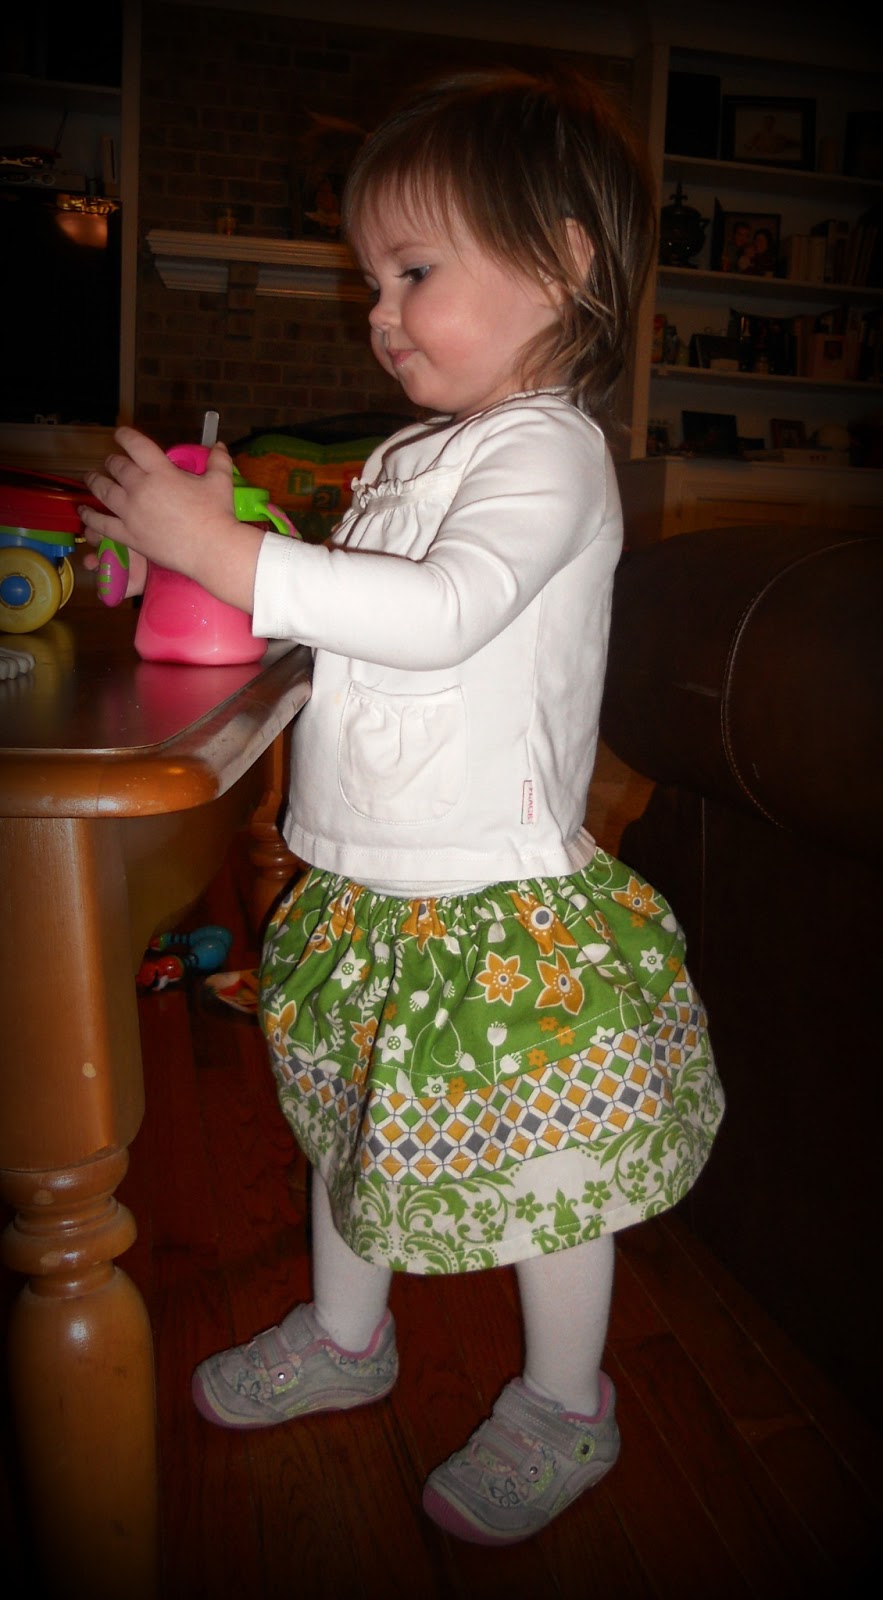
I closed the back seam and we have this adorable skirt!!
PLEASE let me know if you try this skirt. I'd love to see pics and I'm sure Crazy Little Projects would too! Again her site is fabulous and full of fun things to try.

I'm also planning to make a matching hair flower from the fabric scraps.  If you don't sew, I'd be happy to make something similar for you sometime....extra charge if the safety pin opens!! ;)